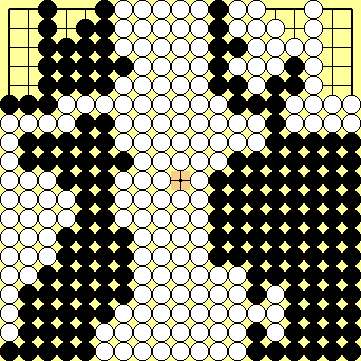
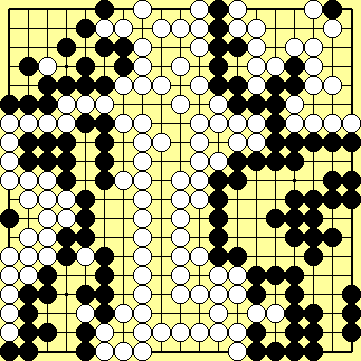
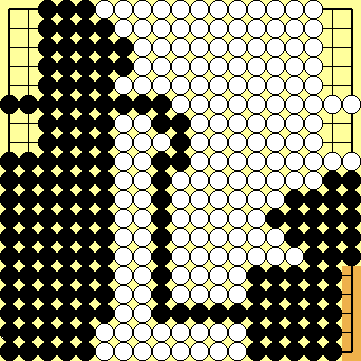
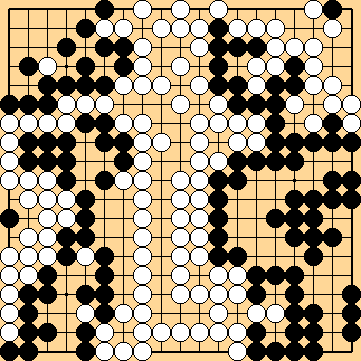
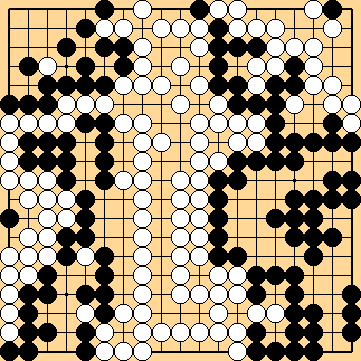
Problem No. 120 from Igo Hatsuyoron
By Inoue Dosetsu Inseki (1646 - 1719)
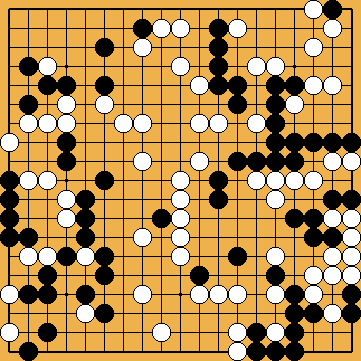 Black to play and win |
 |
Black to play and win |
|

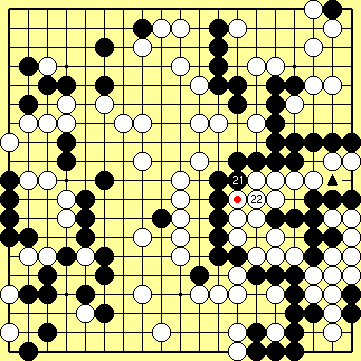
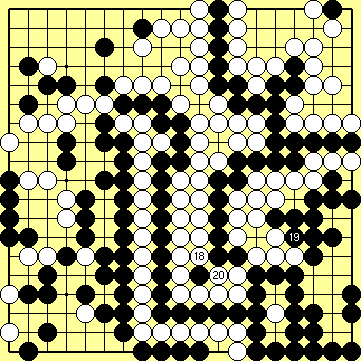
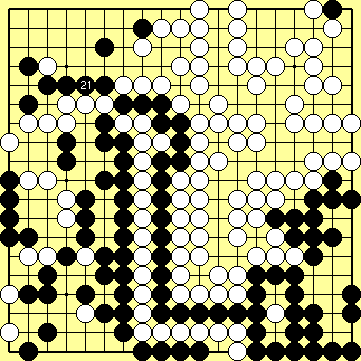
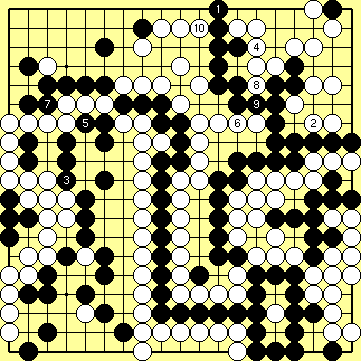
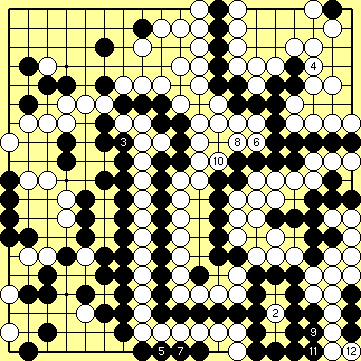
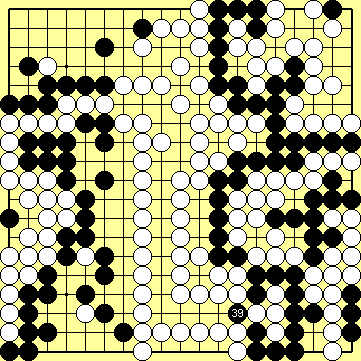
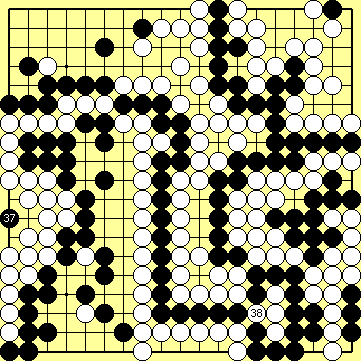
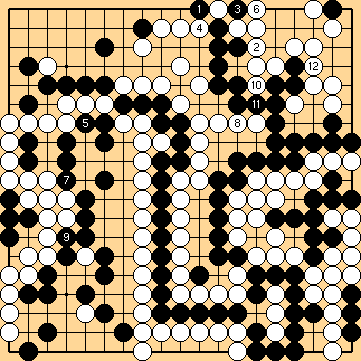
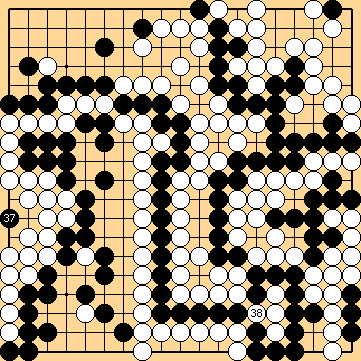
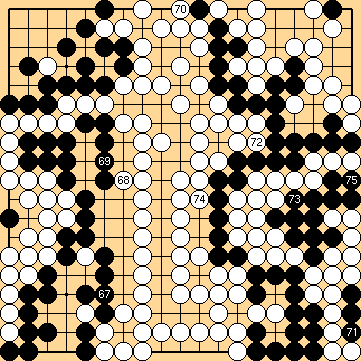
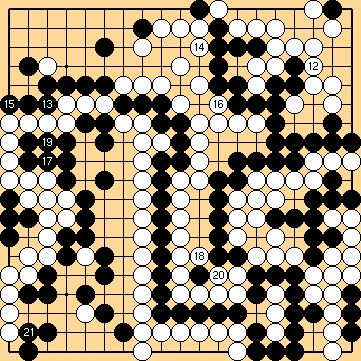
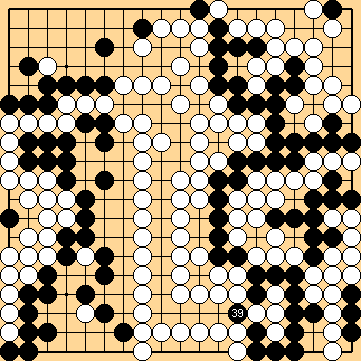
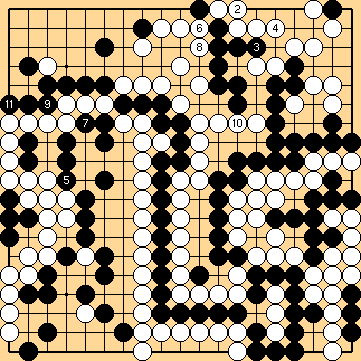
| The various sources agree that Black must not throw in a second time with his move 19, as this would cost him a liberty urgently needed in the late future. Here again it is shown that Black has to prevent a White eye with 21, taking himself the above mentioned liberty. But he remains Sente, because White has to connect at 22. Unlike the Main Path there result two consequences now: 1. The marked White stone has been added on the board. Not only the Black group above, but also the White group below have lost one of their liberties. 2. A White move on the triangled point is not Sente anymore. A White move here forces Black in the Main Path to take himself a liberty by his own. In the sources available to me there are no sequences found to proof the statement mentioned above. So I have tried to find an answer by myself. You will find the results explained below. In my opinion, all countable variations after that second Black Throw-in end 1 or 2 points better for Black than without. So it remains mysterious why this move should be forbidden. Update 2009: This move is a loss of one point for Black, if the Seki in the lower right remains stable until the end of the game. |
 Dia. 19e.1: Consequences on Dia. 19.2 |


|
|
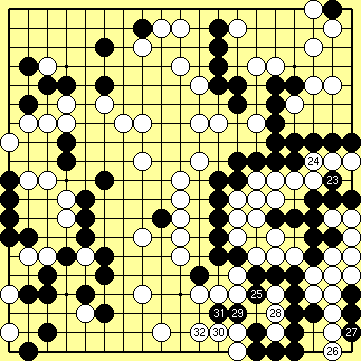
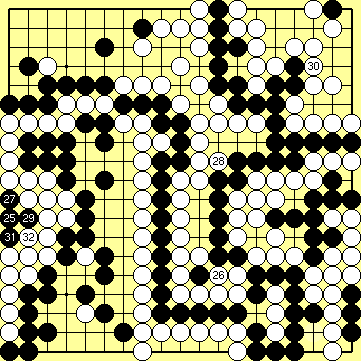
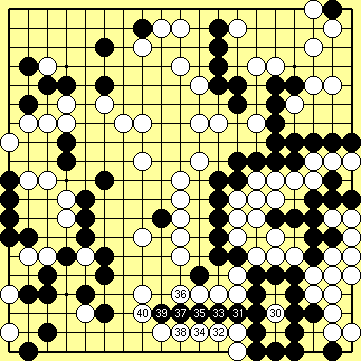
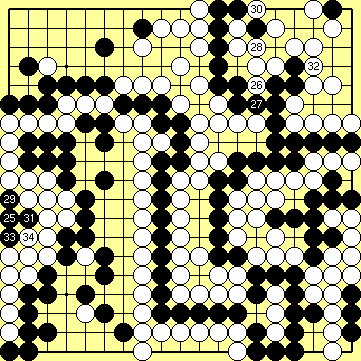
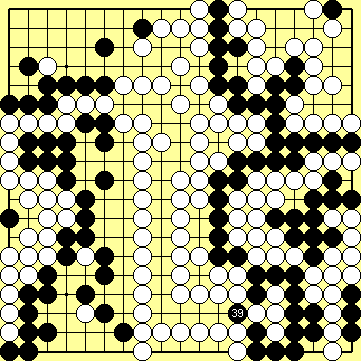
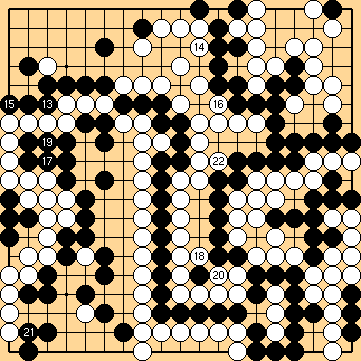
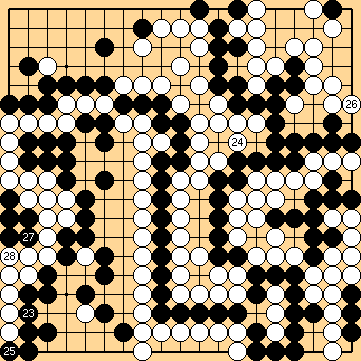
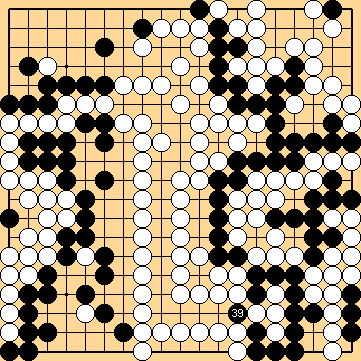
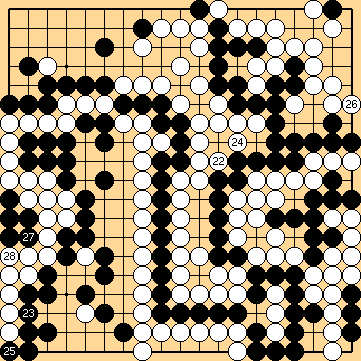
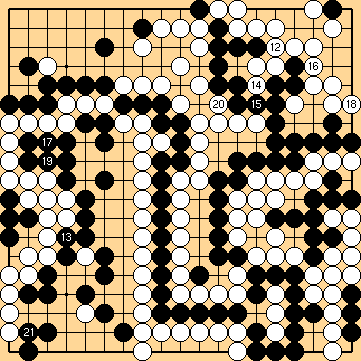
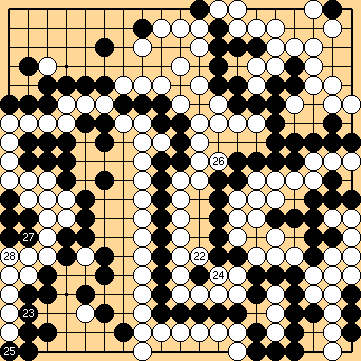
B 23, W 24: Both Black and White follow the course of the Main Path. W 26: One road to Semeai starts with this move at the other 2-1-point of the bottom right corner. [ see variation ] |
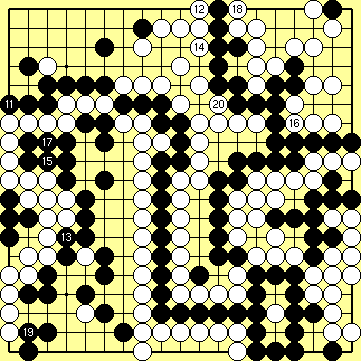
 Dia. 19e.5: B 23 - W 32 |
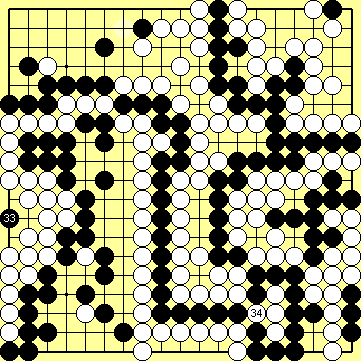
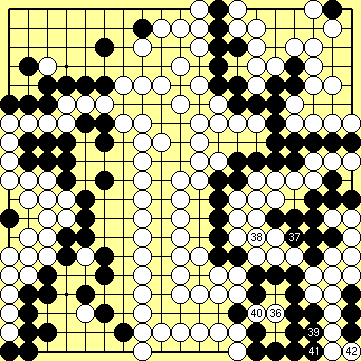
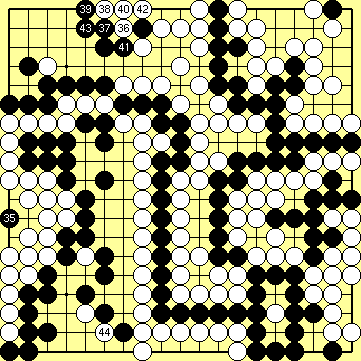
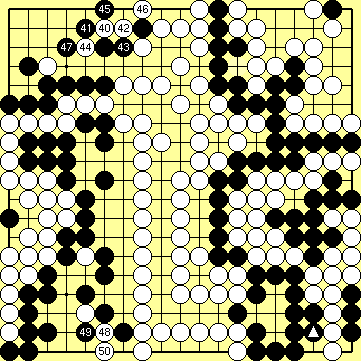
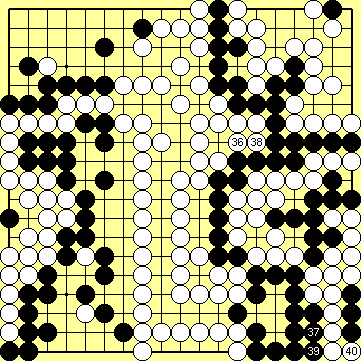
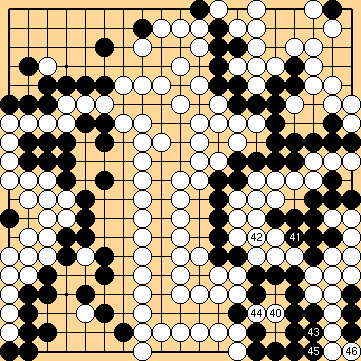
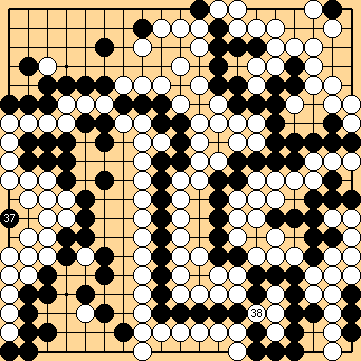
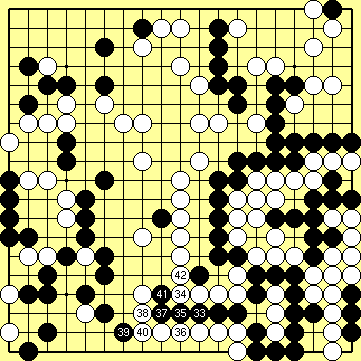 Dia. 19e.6: B 33 - W 42 |
|
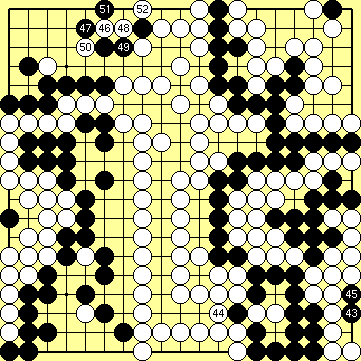
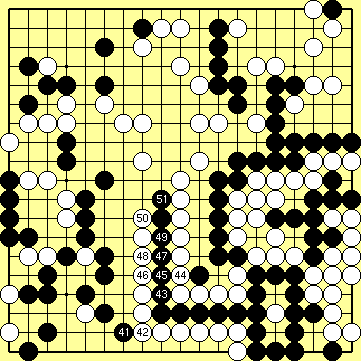
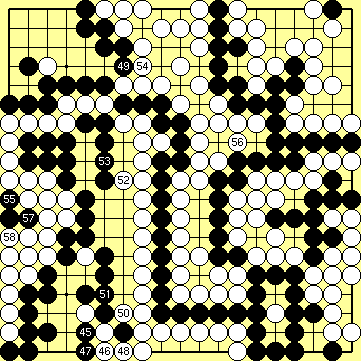
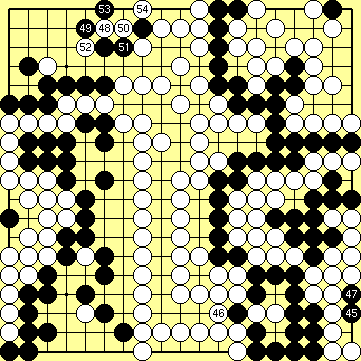
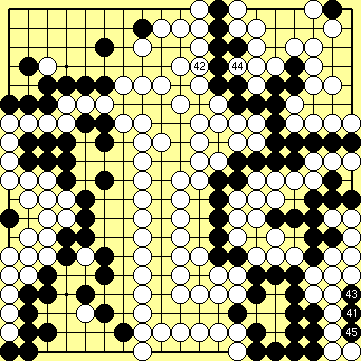
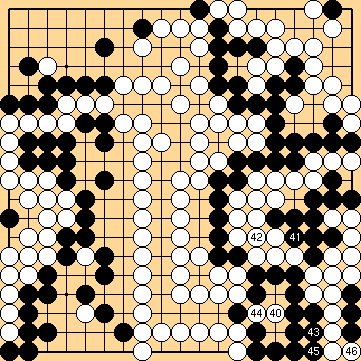
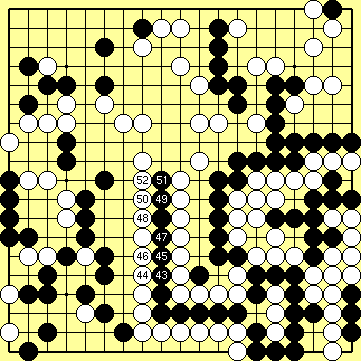 Dia. 19e.7: B 43 - W 52 |
|
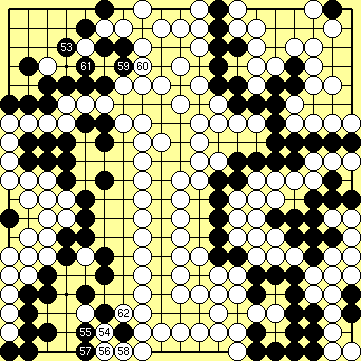
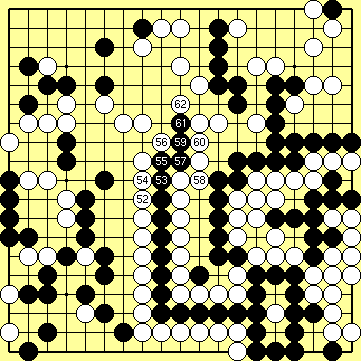
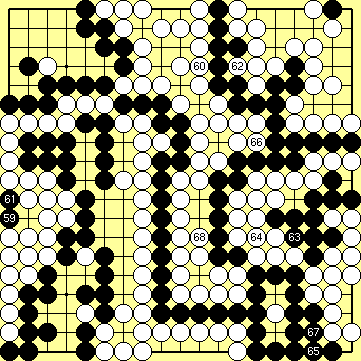
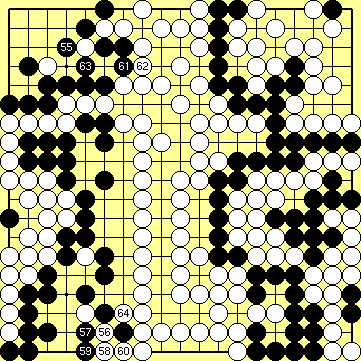
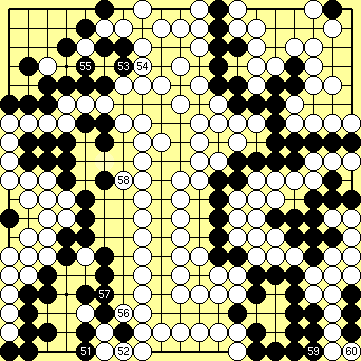
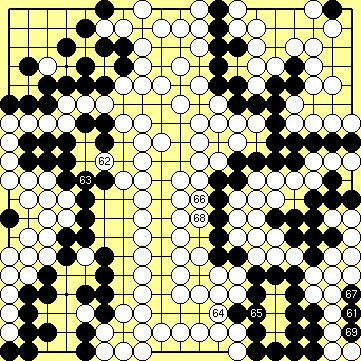
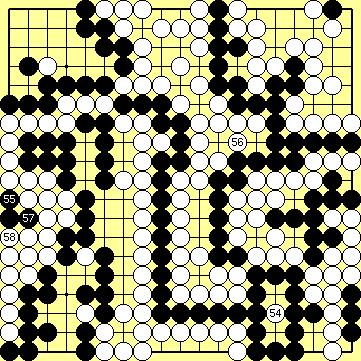
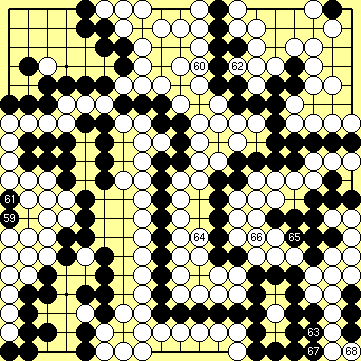
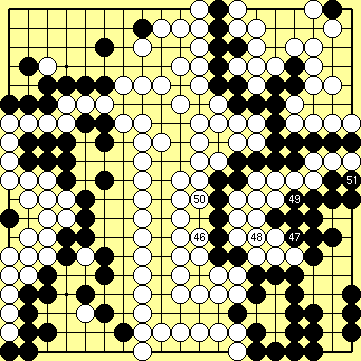
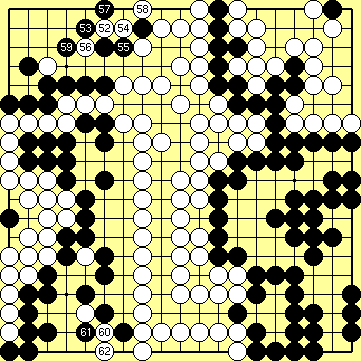
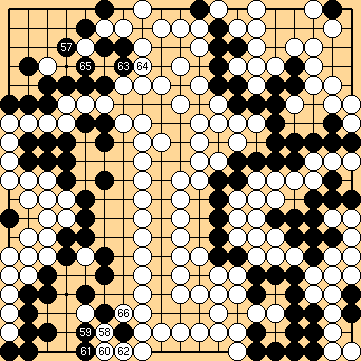
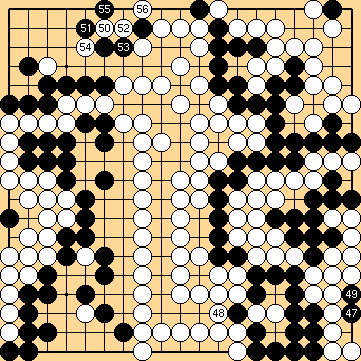
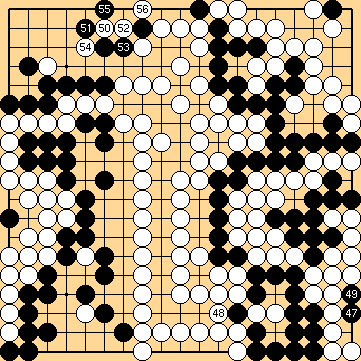
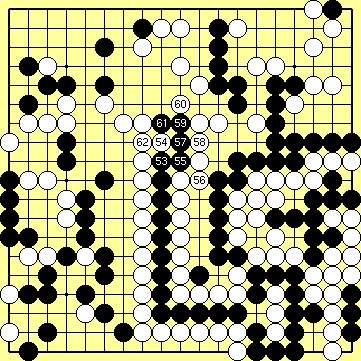 Dia. 19e.8: B 53 - W 62 |
|
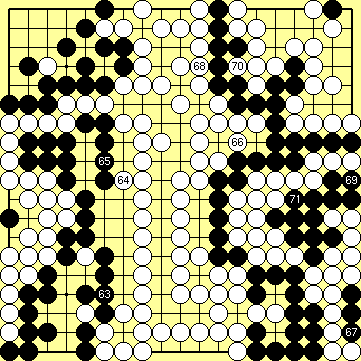
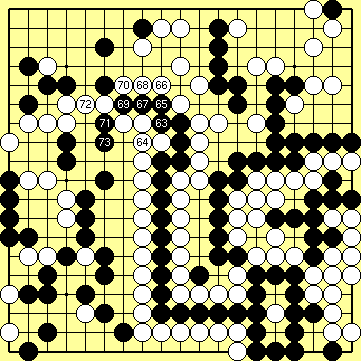
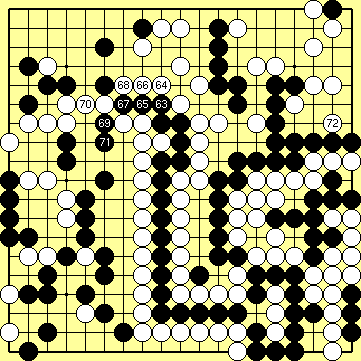
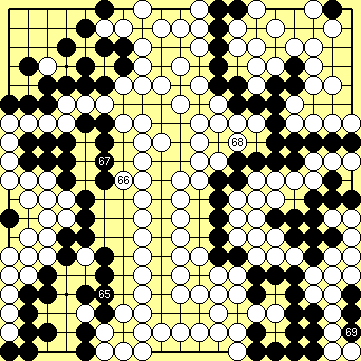
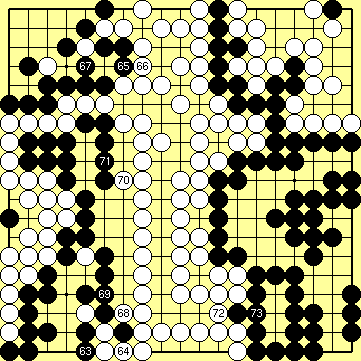
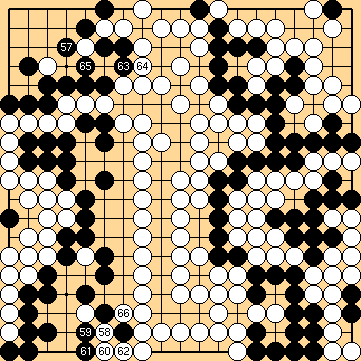
 Dia. 19e.8a: B 63 - B 71 |
|
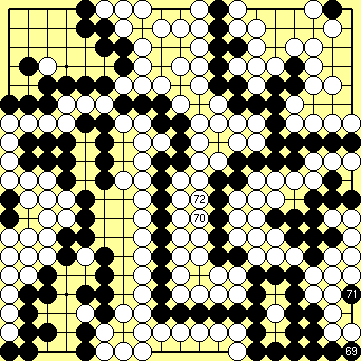
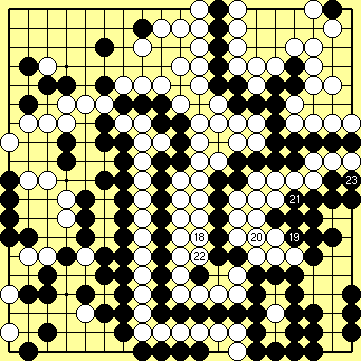
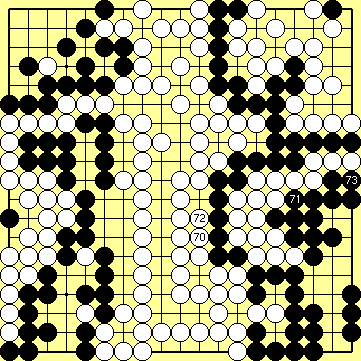
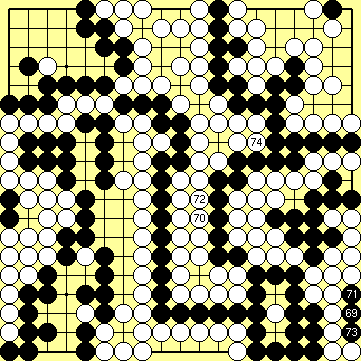
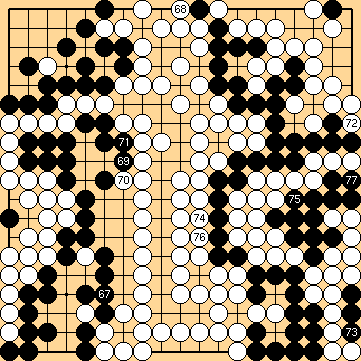
| W 72: Instead of saving her centre group White could start the Semeai with the Black group in the upper right. [ see variation ] |
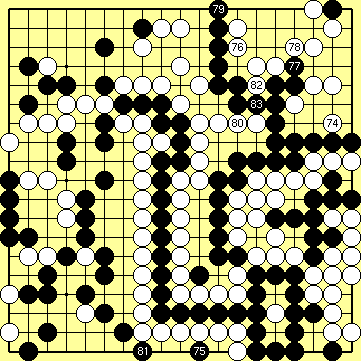
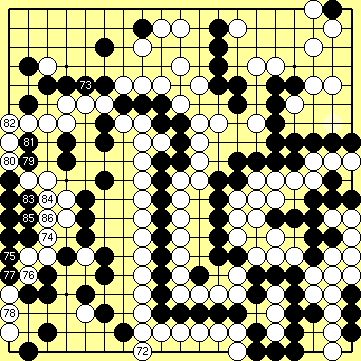 Dia. 19e.28: W 72 - W 86 |
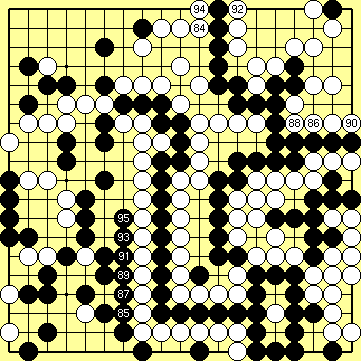
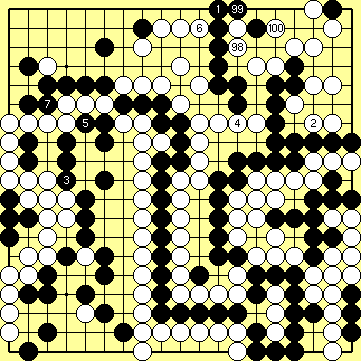
| B 97: The upper right corner seems to remain as the only place on the board where White could lose some additional points of territory. So what about a move on 98 instead ? [ see variation ] |
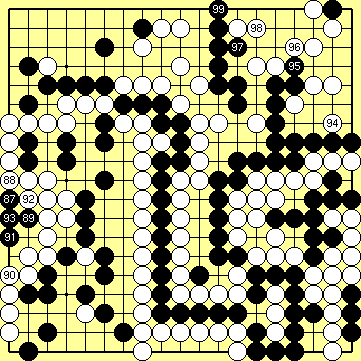 Dia. 19e.29: B 87 - B 99 |
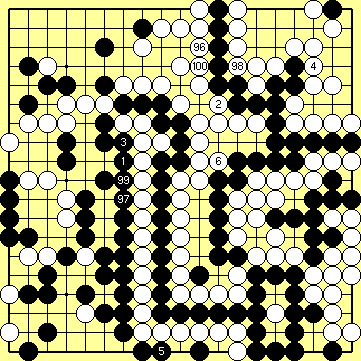
 Dia. 19e.30: W 100 - W 112 |
|
|
|
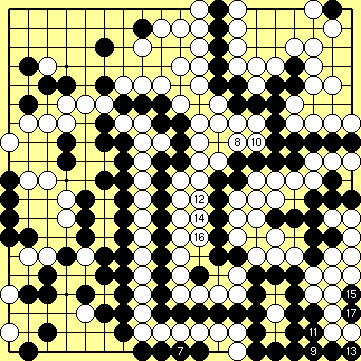
 Dia. 19e.31: B 113 - W 124 |
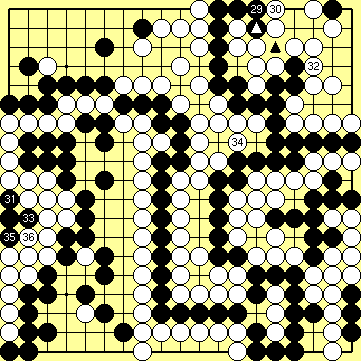
| B 127: It is not possible for Black to interrupt the sequence on the left side and to play (for example) this move in the lower right corner, hoping for an additional 1-point advantage. [ see variation ] |
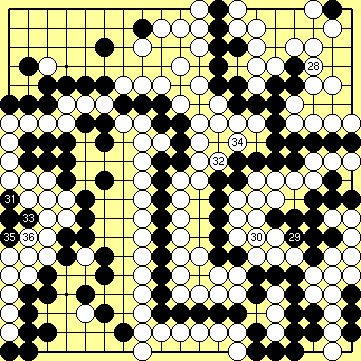
 Dia. 19e.32: B 125 - W 132 |
| W 134: White could follow the sequence in the Weiqi FaYangLun with an Atari in the upper left. [ see variation] |
 Dia. 19e.33: B 133 - W 134 |
|
|
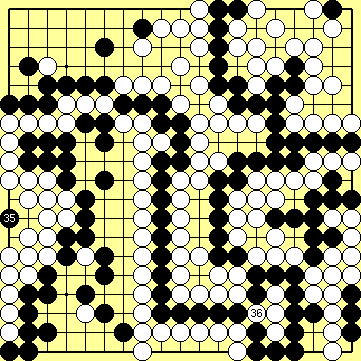
 Dia. 19e.34: B 135 |
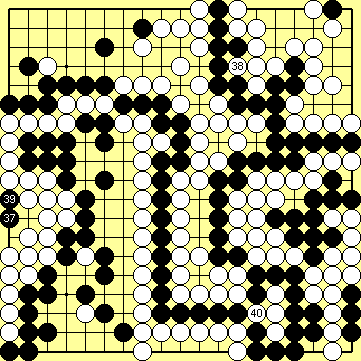
| W 136: This is the last possible moment to start a Semeai in the upper right. [ see variation ] |
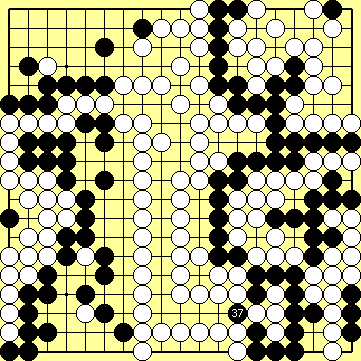
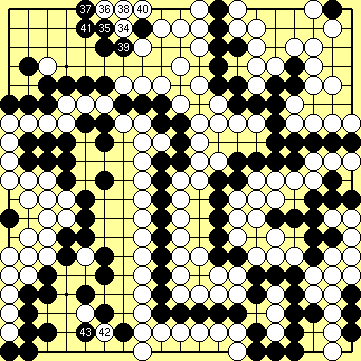
 Dia. 19e.35: W 136 - W 142 |
|
|
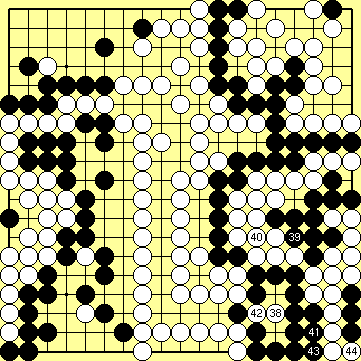
 Dia. 19e.36: B 143 - W 152 |
|
|
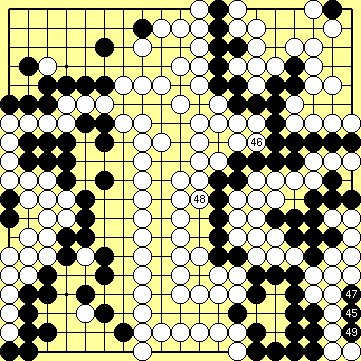
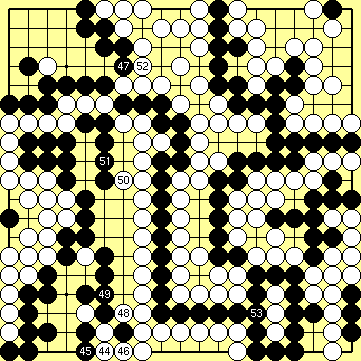
 Dia. 19e.37: B 153 - W 162 |
|
|
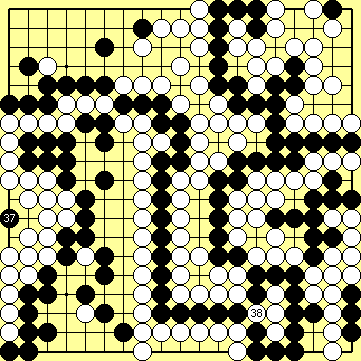
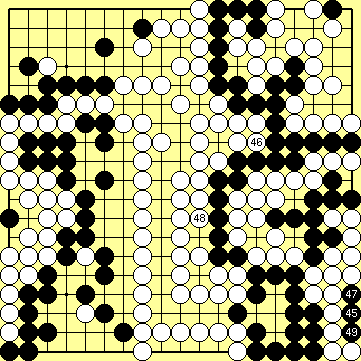
 Dia. 19e.38: B 163 - B 171 |
| Black has captured one additional White stone on the marked point, what more than compensates for the loss of that one Black stone for the second Throw-in. |  Dia. 19e.39: "The End here" |
|
So Black was able to narrow the gap a little bit. White wins by one point. Because this variation is one point better for Black than the Main Path, I would be very interested in getting knowledge of the Semeai mentioned in the sources, which ends in Black's defeat. |
 Dia. 19e.40: "The Score" |
|
|
|
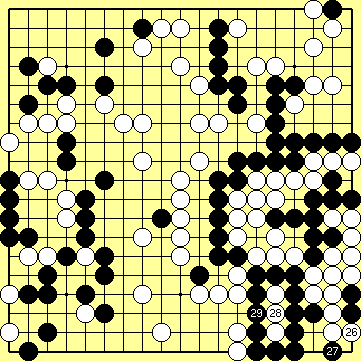
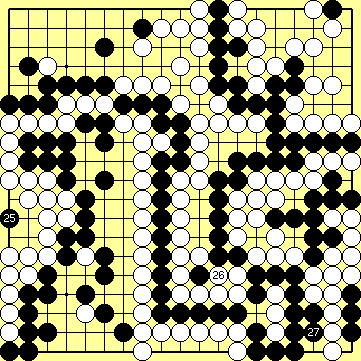
W 26: So White tries the variation that starts with taking the two Black stones in the corner. B 29: Please remember that following the Main Path here and playing this move one point to the left is much faster for Black. We will use the following sequence to show something that might have an effect on other sequences, too. |
 Dia. 19e.17: W 26 - B 29 |
 Dia. 19e.18: W 30 - W 40 |
|
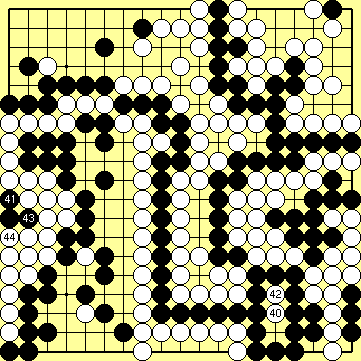
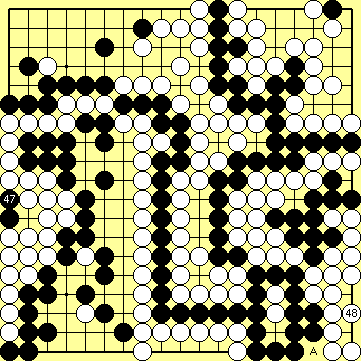
 Dia. 19e.19: B 41 - B 51 |
|
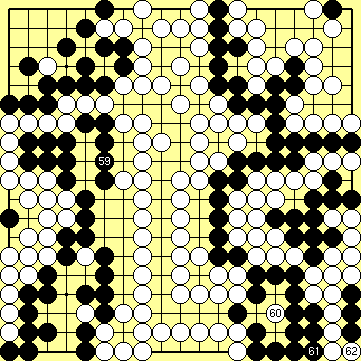
 Dia. 19e.20: W 52 - W 62 |
|
| W 64: As usual White cannot hope on a Ko with 65. |
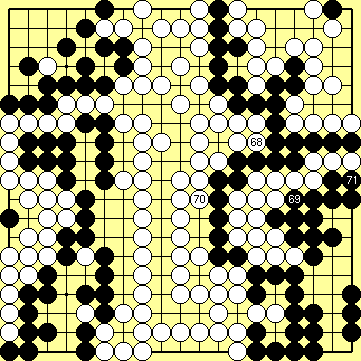
 Dia. 19e.21: B 63 - B 73 |
|
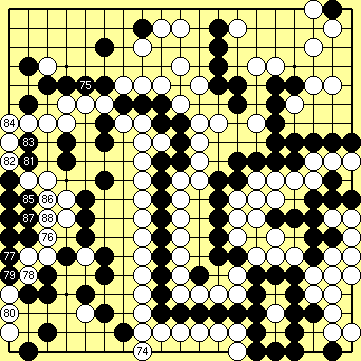
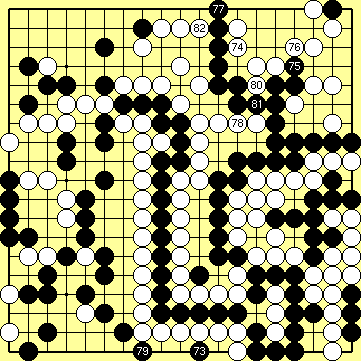
W 74: This move in the upper right (instead of 81) starts the Semeai variation here. |
 Dia. 19e.22: W 74 - B 83 |
 Dia. 19e.23: W 84 - B 95 |
|
 Dia. 19e.24: W 96 - W 106 |
|
|
|
 Dia. 19e.25: B 107 - B 117 |
|
W 120: White is successful and wins the Semeai by one move. |
 Dia. 19e.26: W 118 - W 120 |
|
B 121: But Black closes the upper left corner and wins the game either. All the White stones on the left side are dead. It seems to me that this move had not been recognised so far. Even if White would be successful in the variation for White 70 in the Main Path - without the second Throw-in with Black 19 - in winning the Semeai in the upper right, she would lose the game by this move, too. |
 Dia. 19e.27: B 121 |
|
|
|
W 74: By saving her centre stones White chooses the "peaceful" variation. Without the second Black Throw-in she finally got the Black upper right group. Black in return captured the White group in the lower left. Let's see, what the result will be here. |
 Dia. 19e.41: W 74 - W 88 |
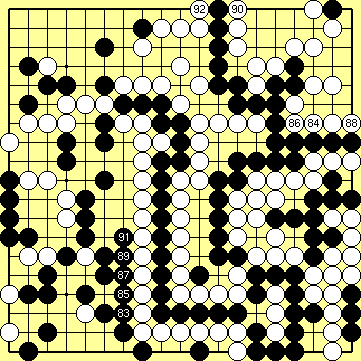
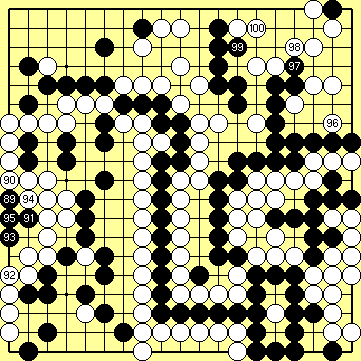 Dia. 19e.42: B 89 - W 100 |
|
 Dia. 19e.43: B 101 - W 110 |
|
 Dia. 19e.44: B 111 - W 120 |
|
|
|
 Dia. 19e.45: B 121 - W 126 |
|
|
 Dia. 19e.46: B 127 - W 134 |
|
|
 Dia. 19e.47: B 135 - W 144 |
|
|
 Dia. 19e.48: B 145 - W 158 |
 Dia. 19e.49: B 159 - W 168 |
|
|
|
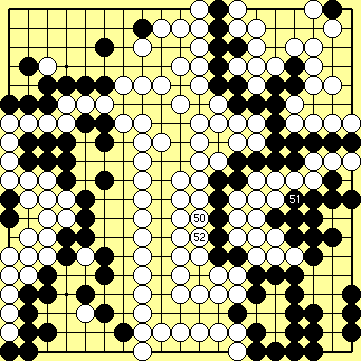
 Dia. 19e.50: B 169 - W 172 |
|
|
 Dia. 19e.51: B 173 |
| The result is the same here in principle. Both sides captured the groups on the right side of the board as before. The squared White stone would otherwise be a Black one (= Black 135) and White would have played the move 134 on the triangled point, taking a liberty of the Black group below. | 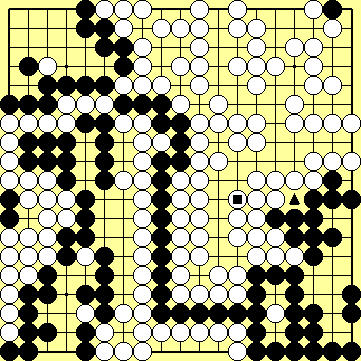 Dia. 19e.52: "The End here" |
| Black wins by 4 points. | 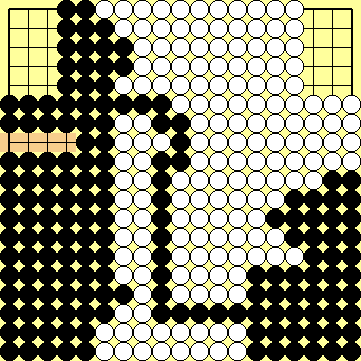 Dia. 19e.53: "The Score" |
|
|
|
W 72: White now starts reducing the liberties of the Black group in the upper right without securing her group on the lower side before. |
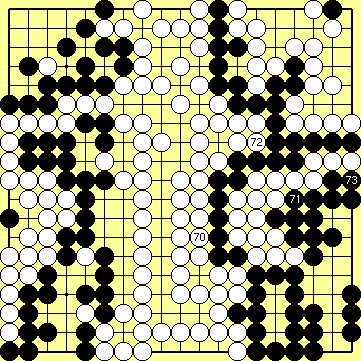
 Dia. 19e.9: B 63 - W 72 |
|
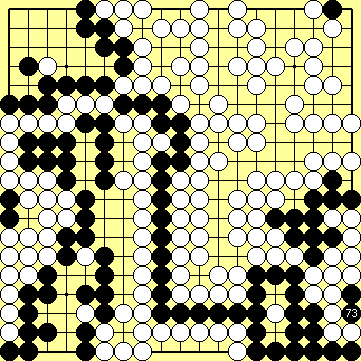
B 73: The Semeai follows a well known path. |
 Dia. 19e.10: B 73 - W 82 |
 Dia. 19e.11: B 83 - W 92 |
|
|
|
 Dia. 19e.12: B 93 - B 101 |
|
|
 Dia. 19e.13: W 102 - W 112 |
|
|
 Dia. 19e.14: B 113 - B 117 |
|
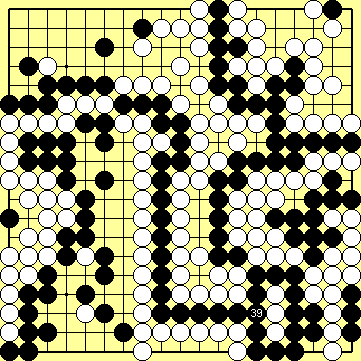
B 123: Black captures the White stones on the right side. White is one move too late. |
 Dia. 19e.15: W 118 - B 123 |
| Black wins the game. |  Dia. 19e.16: "The End here" |
|
|
|
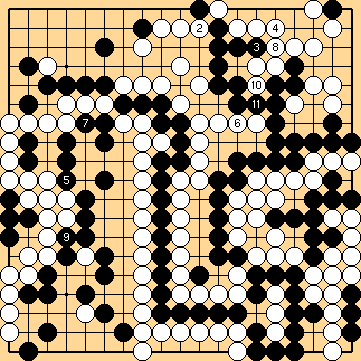
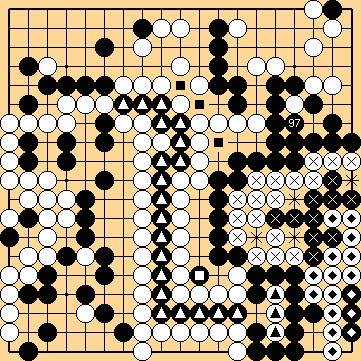
B 97: This Hasami-Tsuke seems to be an obvious alternative at this moment to reduce the White upper right corner. In my opinion there must be a reason why it is not mentioned in the published sources. Joachim Meinhardt was so kind to help me with the following sequences and the commentary. Update 2011: The Hasami-Tsuke is only possible, when Black has played the Guzumi on the marked point in the upper right before. |
 Dia. 19n.1: B 97 |
|
W 100: Prevents further Black actions in this area. |
 Dia. 19n.2: W 98 - B 107 |
 Dia. 19n.3: W 108 - B 117 |
|
|
|
 Dia. 19n.4: W 118 - W 124 |
| W 128: White must force Black to answer the question "To connect or not to connect ?" before she takes the chain of Black stones in the centre off the board. Otherwise she will give opportunities to Black to turn the tables. B 129: It is not possible for Black to connect his stone in Atari with a move at 130. [ see variation ] B 131: The following sequence is equivalent to that of the Main Path. |
 Dia. 19n.5: B 125 - W 134 |
|
|
 Dia. 19n.6: B 135 - W 136 |
|
|
 Dia. 19n.7: B 137 |
|
|
 Dia. 19n.8: W 138 - W 144 |
|
|
 Dia. 19n.9: B 145 - W 154 |
|
|
 Dia. 19n.10: B 155 - W 164 |
|
|
 Dia. 19n.11: B 165 - B 169 |
|
|
 Dia. 19n.12: W 170 - B 173 |
| All Black efforts in the top right corner had no effect on the final result. As before, White has seven points in the marked area, including the captured Black stone. | 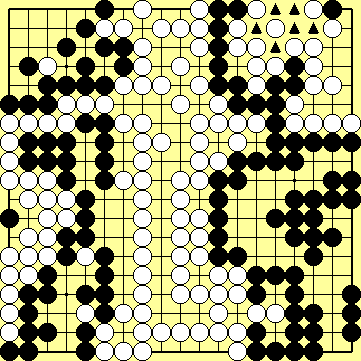 Dia. 19n.13: "The End here" |
| So Black was able to narrow the gap a little bit. White wins by one point. Because this variation is one point better for Black than the Main Path, I would be very interested in getting knowledge of the Semeai mentioned in the sources, which ends in Black's defeat. |
 Dia. 19n.14: "The Score" |
|
|
|
B 129: Black connects his endangered stone in the top right. White would lose four points (three triangled and one at 130), what would be sufficient for Black to turn the tables. But remember that the Black group has to survive this manoeuvre, despite Black has lost a move here. |
 Dia. 19n.16: B 129 - W 136 |
|
|
 Dia. 19n.17: B 137 - W 138 |
|
|
 Dia. 19n.18: B 139 |
|
|
 Dia. 19n.19: W 140 - W 144 |
|
|
 Dia. 19n.20: B 145 - B 149 |
|
W 152: Because Black has lost a move in the beginning, he is one move too late in the end. |
 Dia. 19n.21: W 150 - W 152 |
| White wins the game with ease. |  Dia. 19n.22: "The End here" |
|
|
| B 127: At any moment (except for such Eye stealing moves like 125 here) after having completed the four-stone-formation inside White's Eye on the left side (with 93), Black (mistakenly) could have the idea to play at the 3-2-point of the lower right corner. That is because in every variation analysed so far Black would play at this point after White captured the twenty Black stones in the centre. |
 Dia. 19o.1: B 125 - B 127 |
| W 128: White follows the Main Path for the time being. She cannot answer inside the Seki in the lower right, as this would make it possible for Black to resolve it. Capturing the twenty Black centre stones now loses the game, too. |
 Dia. 19o.2: W 128 - W 136 |
| W 138: White simply continues to take Black liberties in the upper right. Capturing the Black stones in the centre (as "usual") would be not correct here. [ see variation ] B 139: Black cannot capture the three White stones, because his earlier played marked stone took his centre group a liberty. [ see variation ] W 140: Now it is the right moment to capture the Black centre group. |
 Dia. 19o.3: B 137 - W 140 |
| W 142: White does not make the Placement now, but continues to occupy liberties of the Black group in the upper right. |
 Dia. 19o.4: B 141 - W 144 |
 Dia. 19o.5: B 145 - B 149 |
|
| W 152: Black is that one move too late, he had lost in the beginning by playing in the lower right instead of continuing the "usual" sequence on the left side. |
 Dia. 19o.6: W 150 - W 152 |
| White wins the game. |  Dia. 19o.7: "The End here" |
|
|
| W 138: Capturing the twenty Black centre stones is a little bit too early. |
 Dia. 19o.8: W 138 |
 Dia. 19o.9: B 139 |
|
| W 140: It is best for White to start with the Tsuke of Yamada Shinji in the upper right. This time she does not make the Placement inside the four stones Black captured with 139, but keeps it in reserve. Because Black already has the marked stone (= 127) in place, a White placement would be Gote. |
 Dia. 19o.10: W 140 - W 150 |
B 159: Black must be careful here. It is not correct to follow the known path of the "usual" Endgame on the left side. [ see variation ] |
 Dia. 19o.11: B 151 - W 160 |
 Dia. 19o.12: B 161 - B 169 |
|
 Dia. 19o.13: W 170 - B 173 |
|
 Dia. 19o.14: "The End here" |
|
| White's mistake had cost her the game, but Black will not win either. A 1-point advantage compared to the main variation after the second Throw-in is not enough to turn the tables. JIGO. |
 Dia. 19o.15: "The Score" |
|
|
| B 139: In contrast to what is known as "correct" sequence in the Weiqi FaYangLun, it is not correct to capture the three White stones. |
 Dia. 19o.16: B 139 |
| W 142: The key move. |
 Dia. 19o.17: W 140 - W 144 |
 Dia. 19o.18: B 145 - W 146 |
|
| W 148: Black is one move too late. White lives in the corner, gets the whole right side and wins with ease. If Black plays 147 at 148, White answers at A and captures a third Black group. White wins the game. |
 Dia. 19o.19: B 147 - W 148 |
|
|
| B 159: It is a mistake to follow the known path here. This move saves only three points of territory, ... W 160: ... but White gets the well known 4-point advantage through this Placement in the lower right. |
 Dia. 19o.21: B 159 - W 162 |
 Dia. 19o.22: B 163 - B 167 |
|
 Dia. 19o.23: W 168 - B 171 |
|
 Dia. 19o.24: "The End here" |
|
| White wins by 1 point. | 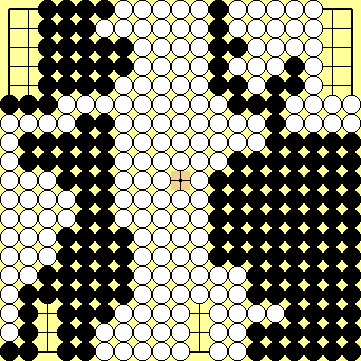 Dia. 19o.25: "The Score" |
|
|
| W 134: In the sequence that is shown as correct solution in the Weiqi FaYangLun Black gets the White lower right corner, White captures the Black upper right group and nevertheless loses the game. As you will see, this outcome does not chance here. |
 Dia. 19p.1: W 134 - B 143 |
 Dia. 19p.2: W 144 - B 153 |
|
 Dia. 19p.3: W 154 - W 158 |
|
 Dia. 19p.4: B 159 - W 168 |
|
 Dia. 19p.5: B 169 - W 174 |
|
 Dia. 19p.6: "The End here" |
|
| Black wins by 5 points. |
 Dia. 19p.7: "The Score" |
|
|
| W 136: In the Main Path variation for White 134 (is 136 here), White continues to occupy liberties of the Black group in the upper right and nevertheless is one step too late. |
 Dia. 19p.8: W 136 - W 140 |
 Dia. 19p.9: B 141 - B 145 |
|
| B 151: What remains true here again, because Black takes the White stones off the board with this move. |
 Dia. 19p.10: W 146 - B 151 |
| W 152: White now starts the Endgame on the left side (and will lose as before). |
 Dia. 19p.11: W 152 - W 162 |
 Dia. 19p.12: B 163 - B 173 |
|
 Dia. 19p.13: "The End here" |
|
| Black wins by 3 points. |
 Dia. 19p.14: "The Score" |
|
|
 Dia. 93p.1: B 93 - W 100 |
B 93: An idea of mine, coming into my mind during the discussions with Joachim Meinhardt. As stated in the "Questions" section (please refer to page 21), Black denies White from getting three points of territory here without hurting the number of liberties of his group. W 94, 96, 98: Capturing the Ko on the left side could result in a "life-life" situation, where both the White group on the left and the Black group in the upper right live. What we do not know with certainty is, 1.: if this Ko capture would be an option for White to win the game and 2.: - in addition - if White could afford not to resolve the Ko on the left with a second move there. I am in fear that finding the answers will be a bit too advanced for someone on Amateur Kyu level. For some results of our research: [ see variation ] B 99: Black connects on the left, because playing at 100 would be Gote. W 100: Now the question arises, if White will be able to keep the two marked points as territory, reducing the advantage of the Black move at 93 to one point. To allow Black to play at this point would result in a 2-point loss for White. |
 Dia. 93p.2: B 101 - W 112 |
B 101: But as a matter of course Black wants more. W 102: Blocking solidly at 102 seems best for White. Other options would be cutting at 104 [ see variation ] or connecting at 103 [ see variation ]. |
 Dia. 93p.3: B 113 - W 122 |
|
 Dia. 93p.4: B 123 - W 128 |
|
 Dia. 93p.5: B 129 - W 136 |
|
 Dia. 93p.6: B 137 - W 138 |
|
 Dia. 93p.7: B 139 |
|
 Dia. 93p.8: W 140 - W 146 |
W 140: The Black group in the upper right has seven liberties, so trying to start a Semeai there will be in vain. |
 Dia. 93p.9: B 147 - W 156 |
|
 Dia. 93p.10: B 157 - W 166 |
|
 Dia. 93p.11: B 167 - B 175 |
|
 Dia. 93p.12: "The End here" |
|
 Dia. 93p.13: "The Score" |
Black wins by 1 point. |
|
|
 Dia. 93p.14: W 102 - B 111 |
B 103: Pushing once more into the White corner seems to be sufficient for Black. B 105: Black cannot capture two White stones with a move at 108, because this would cost him one of his liberties. |
 Dia. 93p.15: W 112 - B 121 |
|
 Dia. 93p.16: W 122 - W 128 |
|
 Dia. 93p.17: B 129 - W 136 |
|
 Dia. 93p.18: B 137 - W 138 |
|
 Dia. 93p.19: B b139 |
|
 Dia. 93p.20: W 140 - W 146 |
|
 Dia. 93p.21: B 147 - W 156 |
|
 Dia. 93p.22: B 157 - W 166 |
|
 Dia. 93p.23: B 167 - B 177 |
|
 Dia. 93p.24: "The End here" |
|
 Dia. 93p.25: "The Score" |
Black wins by 3 points. |
|
|
 Dia. 93p.26: W 102 - B 111 |
W 102: White connects the stone in Atari, but has very bad shape here. B 103: Again, pushing once more into the White corner seems to be sufficient for Black. |
 Dia. 93p.27: W 112 - B 121 |
|
 Dia. 93p.28: W 122 - W 128 |
|
 Dia. 93p.29: B 129 - W 136 |
|
 Dia. 93p.30: B 137 - W 138 |
|
 Dia. 93p.31: B 139 |
|
 Dia. 93p.32: W 140 - W 146 |
|
 Dia. 93p.33: B 147 - W 156 |
|
 Dia. 93p.34: B 157 - W 166 |
|
 Dia. 93p.35: B 167 - W 175 |
|
 Dia. 93p.36: "The End here" |
|
 Dia. 93p.37: "The Score" |
Black wins by 2 points. |
|
|
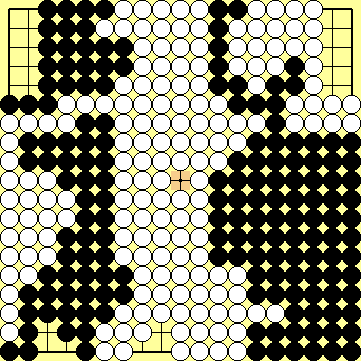
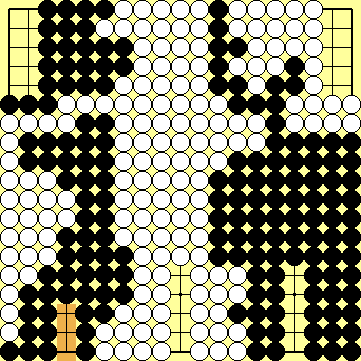
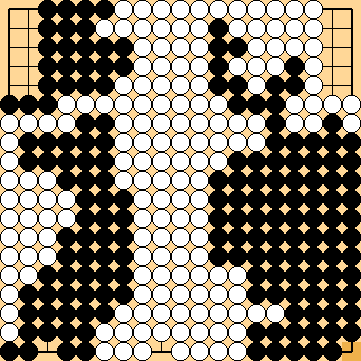
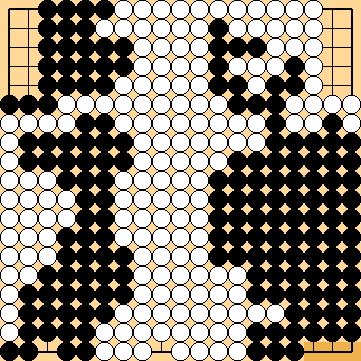
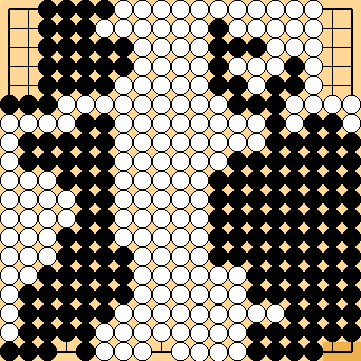
 Dia. 93p.45: "Black lives in the upper right" |
Now let us return to the beginning of this sub² variation. B 97: It is a very astonishing aspect of this problem that living with the group in the top right without having the Seki in the lover right quadrant of the board resolved does not profit Black. Compared to the Main Path: 1. Black will not play additional 2 + 4 + 1 = 7 stones into the Nakade on the left, which will be captured by White. 2. White will not capture the string of 20 Black stones in the centre and not get 18 points of territory there (marked with triangles). Black will not capture 4 White stones in return and get 1 stone recaptured. 3. White will not capture 3 Black stones in the lower right corner. Black will not capture 14 White stones there (marked with diamonds). 4. The 17 White stones in the middle right will not be Black prisoners and 4 liberties of these stones will not be Black territory (marked with crosses). 5. White will not be able to get some 5 points in the centre (marked with squares). That results in 7 + 20 + 18 + 1 + 3 + 5 = 54 points not got by White and 4 + 14 + 14 + 17 + 17 + 4 = 70 points not got by Black. So Black is approximately 25 points behind from the start here. The only place on the board, where Black could take compensation for this disadvantage, is the top left corner. It is a must for Black to prevent that White Endgame there. If White would play there first, Black will not have any chance of winning. |
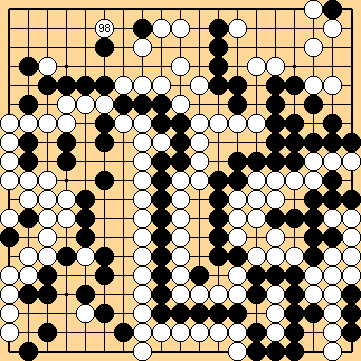 Dia. 93p.46: W 98 |
W 98: So White will not resolve the Ko in the left side, but play the Endgame in the upper left. This Ko is a very asymmetrical one in my opinion. Black will have no chance of winning it. Black will have to find Ko threats big enough to compensate for that 25-points-disadvantage, while White needs only about 5 additional points to win the game. That is because the best Black can get by connecting the Ko is a return to the sequence of the Main Path with White capturing the Black string of stones in the centre. White will win the game. |
|
|
 Dia. 93p.47: W 92 - W 98 |
Above all, White could end all the discussion about that Black "bad-shape"-move with 93 by changing the order of moves. She simply plays on that point by her own with her move 92 and may return to the Atari on the left with 98. So the question arises whether it would be possible for Black to play that "bad-shape"-move earlier. |
|
| |
|
|